
In an ideal world, any bitmap fonts would be rendered at a 1:1 scale, and we’d use vector fonts with fancy subpixel antialiasing whenever possible…
But in reality, at least the reality of game development, we often need the performance and versatility of bitmap fonts, and it’s rarely possible to achieve pixel-exact rendering, especially when dealing with platforms that have dozens of screen resolutions.
But that doesn’t mean that your game text has to look bad. If you simply avoid making some common mistakes, bitmap fonts can look pretty good, even when heavily downscaled. Unfortunately, it’s quite common to see font rendering done pretty badly… so here’s some tips.
Creating bitmap fonts
Well, just about everyone uses BMFont these days, from AAA studios to solo indies. It’s used by some of the most popular Unity 2D/UI packages (NGUI and 2D Toolkit), too.
There’s not really much to say about the BMFont process. Just make sure you export the font at a large size, at least the largest you need to display. Never try to upscale bitmap fonts (or bitmaps in general), it’s never going to look pretty. But with a bit of care, downscaling can be made to look rather good.
Try to fit your BMFont fonts onto a single texture page. If there’s free space, increase the font size until the texture is close to full.
You can take the output texture into Photoshop, and easily add an outline, bevelled edge, drop shadow, and so on. If you’re adding outlines or drop-shadows, you’ll need to use the padding settings in BMFont, to leave space around each glyph for these.
Texture Filtering: Doing it right
This is where people often get things wrong. Here’s some examples of different texture filtering setups, on a font which is being scaled down a lot. Yes, it’s best to avoid scaling quite this much, but sometimes it makes things simpler – if you have multiple text sizes, and running on Retina and non-Retina iOS devices, for example. It’s also not the cleanest font for a test like this, with the bevel and gradient on it – but it still shows the difference between texture filtering setups quite clearly (click for full-sized image):

Example 1 – well, it’s just there as a comparison. Nobody should use point sampling unless they’re rendering at 1:1, or going for an intentionally pixellated look.
Example 2 – This is fairly common. People avoid mipmaps on font textures, as ‘it makes them blurry’. In this case, it doesn’t look terrible, but it gives quite jagged edges when there’s a lot of downscaling. We can do better.
Example 3 – Mipmaps, with just bilinear filtering. Extremely blurry, as only a lower-res mipmap is being used. Yuck.
Example 4 – Trilinear filtering. Now it’s taking a weighted average from sampling two mipmap levels. A definite improvement, but still a bit soft. But that’s fixable.
Example 5 – Now we’ve added a negative mip bias. Negative values bias the sampling towards higher-resolution mipmap levels. The -0.65 was chosen here, as to my eye, it was a nice balance between smooth and sharp. You may want to tweak it a bit, depending on your specific font.
Example 6 – A slightly stronger bias, biasing by one whole miplevel. This also looks good. Not a huge difference from 5, but the diagonals are starting to get just slightly more jagged.
Example 7 – Just for comparison. This very high mip bias has completely negated the effect of mipmapping, and it looks just like test 2.
Mip Bias? – How do I do that?
If youre working with D3D or OpenGL on desktop machines, look up D3DSAMP_MIPMAPLODBIAS or GL_TEXTURE_LOD_BIAS.
On mobile (GL ES), or if you’re using Unity, you’ll have to do it via a shader, and use tex2Dbias to sample your texture (If you’re using 2DToolKit or NGUI, it’s easy to create a modified version of one of the included shaders, with an added Mip Bias parameter, and using tex2Dbias)
Texture ‘fringing’ and solutions
Whenever alpha blending is used (and particularly when Photoshop is involved), you can end up with nasty white (or other colour) fringes, like this:
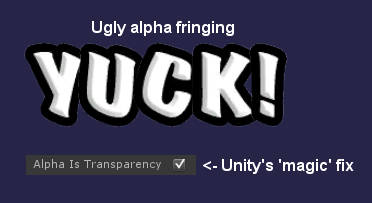
This happens because the transparent (alpha=0) pixels in your image have RGB values which don’t match the edge of your image (in this case, they’re white).
When bilinear/trilinear filtering is used, Texture sampling will take a weighted average of the R,G,B, and A values of a number of texels. So around the edge of the image, the colour values from completely transparent texels are being included in this average!
Ideally, more people would understand premultiplied alpha, as it’s the most ‘correct’ solution to this problem. But the alternative is to make sure these transparent pixels have sensible RGB values.
Unity 4.2 added an ‘Alpha is Transparency’ button, which is an automated fix for this in most cases, it will set the RGB values of transparent pixels to match nearby non-transparent pixels. A while back, I wrote a little C# tool to perform a similar fix myself, essentially ‘extruding’ the colour outwards from non-transparent edges into nearby transparent pixels. Other people recommend a ‘Solidify’ filter for Photoshop, which does the same sort of thing.
Or you could use premultiplied alpha. I should probably write something about that one day, as it’s pretty awesome.
One more thing: Text with outlines
Outlined fonts. It’s a common thing to want to do, in games where text may be rendered over any background. But very few font rendering systems support it well…
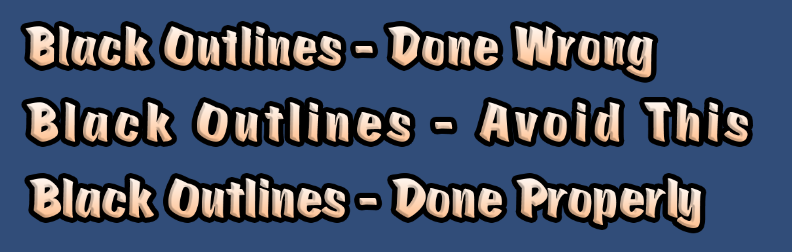
The first example shows the naive way to attempt it – and what goes wrong – when there’s a chunky outline, the outline overlaps the previous character, and this looks bad. Option 2 is an exaggerated example of the all-too-common solution, to simply space the characters out more…. Don’t do this!
The final example shows how it should look. The solution is trivially simple. Render the black outline first, then render the (un-outlined) glyph on top.
The simplest way to achieve that would be to use two textures, but if the outline is black, you don’t need that. Use vertex colours to render the font (glyph+outline) in pure black. The use additive blending to *add* the glyphs – the non-black bits – on top (without redrawing the outline).
And if you understand premultiplied alpha, you can do this in a single draw call, without changing renderstates!
(The images in this post were created using 2D Toolkit in Unity, after modifying its font renderering code to handle two-pass outlined fonts, and adding shaders with mipbias support)
9 comments
Great article, much appreciated! Now I gotta figure out how to mip-bias with NGUI for GL ES 2.x…
Very cool! Could you put the cherry on top and post the shader code for Unity, or how to exactly modify a Toolkit 2D shader (and which one you would recommend for that)?
Seems like I am not the only one struggling with that…
Howdy!
Great article – we’re looking into getting our textures to look nice in iOS using tk2d with mip maps and having a little problem getting the bias function. It seems like we need to do the swap you’re recommending to shaders with tex2DBias enabled.
Do you happen to have the modified tk2d shaders you used in this example?
Cheers!
Thanks for the great article mate but I have had no luck on setting the bias in Unity using CG. Do you have an example?
Hi there,
Is it possible for you to post the code for getting the last image with 2D Toolkit? That seems very interesting.
Thanks
Please post the code for the outline solution you’re using in 2d Toolkit – it can be extremely helpful to a lot of people struggling to get this right…
Ah, the bit that I’d missed had been pointed out in a comment on my more recent post – you also need a #pragma glsl (under the CGPROGRAM line).
I’d avoided posting complete shaders as technically copyrighted parts of NGUI/2D Toolkit (with my slight modifications). And explaining how to do it in any shader seemed more useful anyway.
Hi,
Can you at least tell which script to modify and what line to change into what? I am not really much into shaders so that would be a big help.
By the way, there is something else in Unity which is effecting the font quality a lot. That is the quality settings. If the texture is not full res, then your fonts will never look good.
Also, try to put fonts at full integer locations. Like 200,100,1 instead of 100.234, 100.845,1
Thanks again for great article.
Hey,
I have just one question 😛 How would you change the color of one or multiple characters ? If my bitmap contains 16×16 white characters wouldnt I have to pretty much tell my shader to change from white to any RGB value I want ?
Thanks 😛